

Debian SELinux Tutorial - Confine All Processes
This article details how to set up full confinement on a Debian Linux workstation. This complies with the CIS (Center for Internet Security) level 2 benchmark for Linux workstations/servers which require all processes to be confined by an SELinux policy.
Debian by default ships with AppArmor, which is similar to SELinux but relies on paths and is not as flexible, whereas SELinux relies on more reliable inodes. They both utilize a part of the Linux Kernel known as “Linux Security Module”, or LSM for short. They both utilize this, but in different ways.
An example of AppArmor being “weaker” is that AppArmor does not have much support for restricting certain outbound network communications from restricted processes (as far as I know, I could be wrong or newer versions could work better). Also, with SELinux much of the work is already done for you! Nearly all the system daemons, processes that run as root, or high risk processes like Java will already have a policy defined and be enforcing when you install them, greatly reducing the time needed to generate certain policies. With AppArmor, I haven’t found a go-to list of AppArmor profiles that I can quickly use on any Debian system.
There are some differences for setting up complete confinement as compared to a Red Hat based Linux distribution. While Debian supports SELinux, many of the tools and SELinux related code has been written directly by the Red Hat team for use in their operating system. This requires some tinkering around and take up some additional time as compared to Red Hat, so this is why I decided to write this article.
During Debian Installation, I decided to use Cinnamon as the Desktop Environment. Whichever you choose, the process should be the same or very similar.
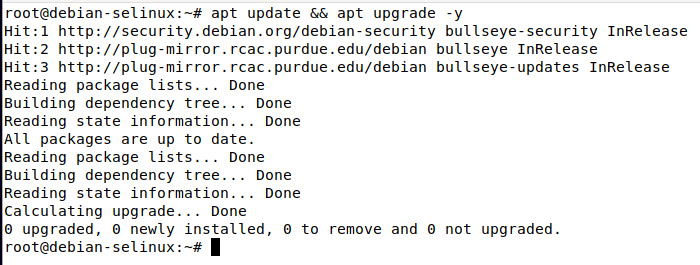
Once you installed Debian, you will want to run the following commands as root in order to fully update the system:
apt update && apt upgrade -y
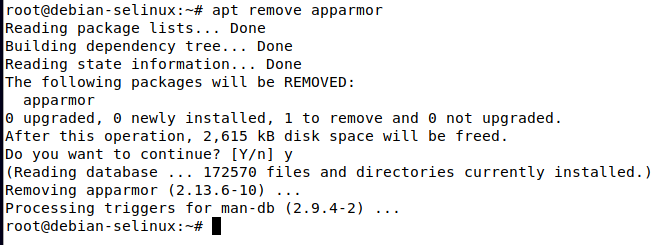
Next, you will want to remove AppArmor from the system, as AppArmor and SELinux cannot coexist on a system, and AppArmor comes installed by default on Debian 10 and above.
apt remove apparmor
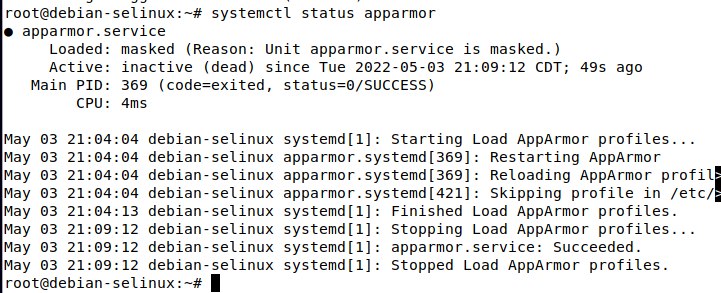
Next, if you run the command
systemctl status apparmor
you should see that the systemd unit file is now masked, because the software has been removed from the system:
Then, to be safe I would go ahead and reboot the machine, so that there is no trace of AppArmor left. This step may not be necessary, but doesn’t take much time either.
Once the machine is rebooted, we can begin installing the packages required for SELinux and policy generation.
For bare bones functionality, all you will need is selinux-basics, selinux-policy-default, and auditd. Note that auditd does not come with Debian by default, a difference between Red Hat based systems.
However, in my experience, you will also want sepol-utils and selinux-utils, this will give us sepolgen and audit2allow as well as other utilities which will make your life much easier in allowing denied actions and creating custom policies.
You can install all of these with the following command run as root:
apt install selinux-basics selinux-policy-default auditd sepol-utils selinux-utils
Once these packages are installed, run the following command as root to activate selinux:
selinux-activate

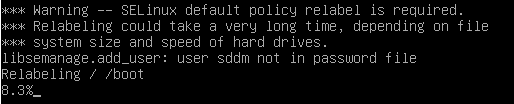
Now, reboot the system. The system will automatically label everything on the filesystem, a requirement for selinux. This may take a while, especially if there are a lot of files on the system.
Upon rebooting, you will see a message on the console similar to this which indicates filesystem relabeling is taking place:
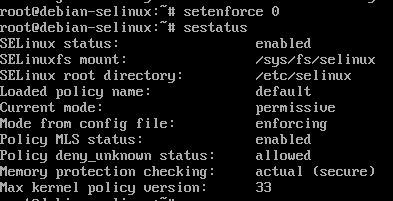
Once relabeling is complete, the system will automatically boot. Note that by default SELinux will be in “permissive” mode, so that no actions will be enforced, denials will be logged to syslog or more commonly /var/log/audit/audit.log.
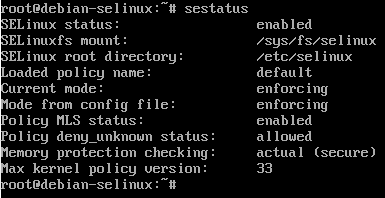
Once you boot into the system, run the following command to see the status of SELinux and ensure that everything is working correctly:
sestatus
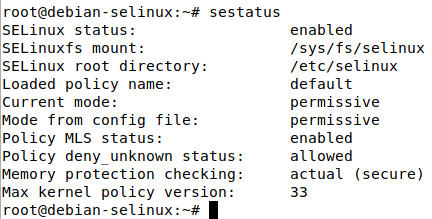
As shown in the screenshot, the current mode of SELinux is permissive, and the mode specified in the config file is also permissive, meaning that is the behavior SELinux will inherit when the system is booted.
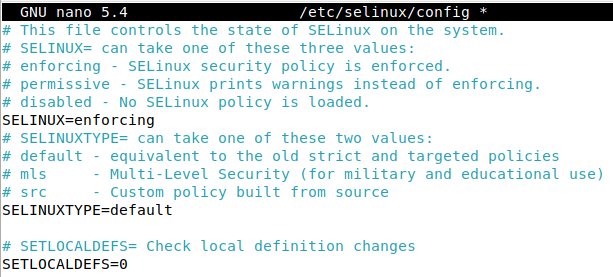
The aforementioned config file is located at /etc/selinux/config
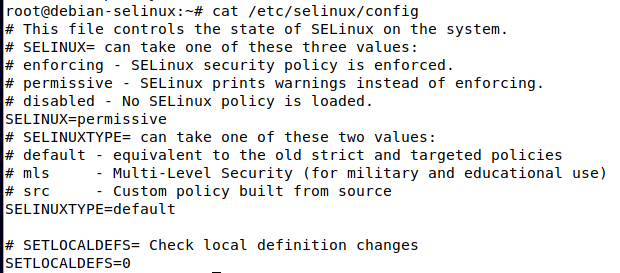
As shown in the above screenshot, the line that specifies the permissive/enforcing mode is at SELINUX=permissive
Before we change this to enforcing, lets allow any denied actions that have occurred since the first boot with SELinux using the audit2allow tool by using the following command:
audit2allow -a -l -M firstboot
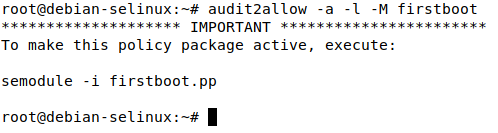
This will generate 2 files in the current working directory, firstboot.te and firstboot.pp . The .te file is the SELinux policy, but it must be compiled before it can be loaded into the system. The .pp file is the compiled SELinux policy. As indicated in the command output, we can load this policy using semodule -i firstboot.pp. However, lets take a look at the .te file first to see what was allowed:
By catting out the .te file, in my system I see the following contents:
module firstboot 1.0;

require {
type kernel_t;
type devicekit_disk_t;
type xdg_data_t;
type NetworkManager_t;
type etc_t;
type devicekit_power_t;
type var_run_t;
type colord_t;
type xdg_cache_t;
type accountsd_t;
type cgroup_t;
type policykit_t;
type vdagent_t;
type blueman_t;
type systemd_sessions_runtime_t;
type avahi_t;
type tmp_t;
type unconfined_t;
type cupsd_t;
type gkeyringd_exec_t;
type system_dbusd_t;
type initrc_t;
type udev_t;
class dir { read search watch write };
class process { execmem getsched setsched };
class file { entrypoint execute getattr map open read write };
class dbus send_msg;
class capability sys_nice;
class filesystem getattr;
class system module_request;
class fd use;
}

============= NetworkManager_t ==============
allow NetworkManager_t xdg_cache_t:dir search;

============= accountsd_t ==============
allow accountsd_t unconfined_t:dbus send_msg;
allow accountsd_t xdg_cache_t:dir search;

============= avahi_t ==============
allow avahi_t colord_t:dbus send_msg;
allow avahi_t etc_t:dir watch;
allow avahi_t unconfined_t:dbus send_msg;

============= blueman_t ==============
allow blueman_t policykit_t:dbus send_msg;
allow blueman_t self:process getsched;
allow blueman_t tmp_t:dir write;
allow blueman_t tmp_t:file { execute map open read write };
allow blueman_t unconfined_t:dbus send_msg;
allow blueman_t xdg_data_t:dir search;

============= colord_t ==============
allow colord_t avahi_t:dbus send_msg;
allow colord_t systemd_sessions_runtime_t:dir search;
allow colord_t systemd_sessions_runtime_t:file { getattr open read };

============= cupsd_t ==============
allow cupsd_t self:capability sys_nice;
allow cupsd_t self:process getsched;

============= devicekit_disk_t ==============
allow devicekit_disk_t initrc_t:dbus send_msg;

============= devicekit_power_t ==============
allow devicekit_power_t initrc_t:dbus send_msg;

============= initrc_t ==============
allow initrc_t unconfined_t:dbus send_msg;

============= policykit_t ==============
allow policykit_t blueman_t:dbus send_msg;
allow policykit_t xdg_cache_t:dir search;

============= system_dbusd_t ==============
allow system_dbusd_t unconfined_t:fd use;
allow system_dbusd_t xdg_cache_t:file read;

============= udev_t ==============
allow udev_t var_run_t:file getattr;

============= unconfined_t ==============
allow unconfined_t gkeyringd_exec_t:file entrypoint;

!!!! This avc can be allowed using one of the these booleans:
allow_execmem, allow_execstack
allow unconfined_t self:process execmem;

============= vdagent_t ==============
allow vdagent_t cgroup_t:filesystem getattr;
allow vdagent_t kernel_t:system module_request;
allow vdagent_t self:capability sys_nice;
allow vdagent_t self:process { getsched setsched };
allow vdagent_t systemd_sessions_runtime_t:dir { read search watch };
allow vdagent_t systemd_sessions_runtime_t:file { getattr open read };
As we can see in the beginning of the .te file there is a require section, which specifies the different types and actions the policy references. Then later on, each access of individual types and specific actions is explicitly stated. You may notice alerts that talk about booleans. There are various SELinux booleans which can be turned on or off with the setsebool command:
setsebool -P allow_execmem 1
The previous command will enable the allow_execmem selinux boolean. The -P option means to persist this setting across boots in a permanent manner. Note that this behavior may not be something you want to allow depending on your security requirements, this activity is potentially risky.
Audit2allow generated this .te file for us, and compiled it into the .pp, which can be loaded with the command mentioned in the audit2allow output:
semodule -i firstboot.pp

Now, all those previously denied actions will be allowed. Note that all of it was allowed due to SELinux being in permissive mode, but it would have been blocked if enforcing mode was enabled.
We can also view these denials by running cat /var/log/audit/audit.log | grep -i denied

The AVC mentioned in the example denial message stands for Access Vector Cache. This is a critical component of how SELinux works.
Since we allowed the activity denied from the first boot, lets reboot and ensure nothing will be blocked once we enable enforcing mode.
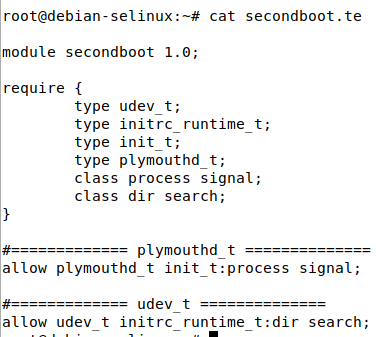
By rerunning the previous audit2allow command with a different policy name (secondboot), and load it with semodule. We can see another denial was detected by catting out the policy .te file:
Note that if audit2allow does not detect any AVC denials in the log messages, it will output the following error:

Now, lets reboot again and ensure there are no more denials on the third boot:

Since we got the compilation error from audit2allow, this means there was most likely no denial messages in the audit log.
Now, we can edit the previously mentioned line in /etc/selinux/config and change permissive to enforcing. This will make SELinux start in enforcing mode on the next boot.
After making that modification, reboot the system.
Upon logging into my user account, I now find that gnome-terminal no longer works, most likely relating to SELinux. However we can change to a different tty and log into the console, or open Xterm.
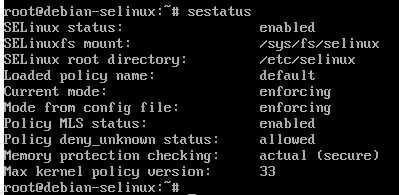
By running the sestatus command, we can now see the config file mode is enforcing and the current running mode is enforcing:
By running audit2allow again we can presumably allow the denied actions:
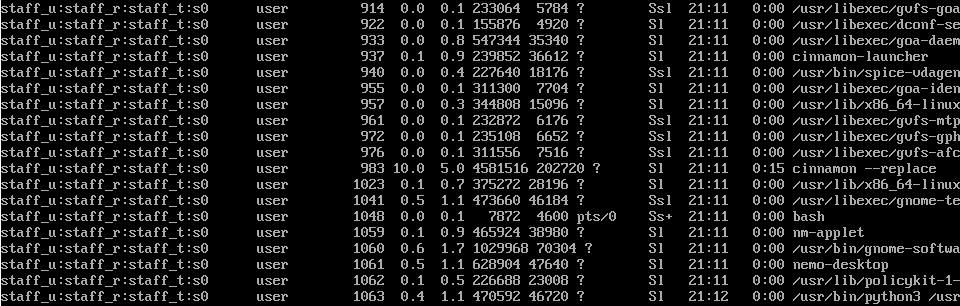
Note that many common linux commands such as ls, ps, cp, and more have a -Z parameter, which involves SELinux labeling. For example, running ps auxZ will display processes with the associated SELinux labels:
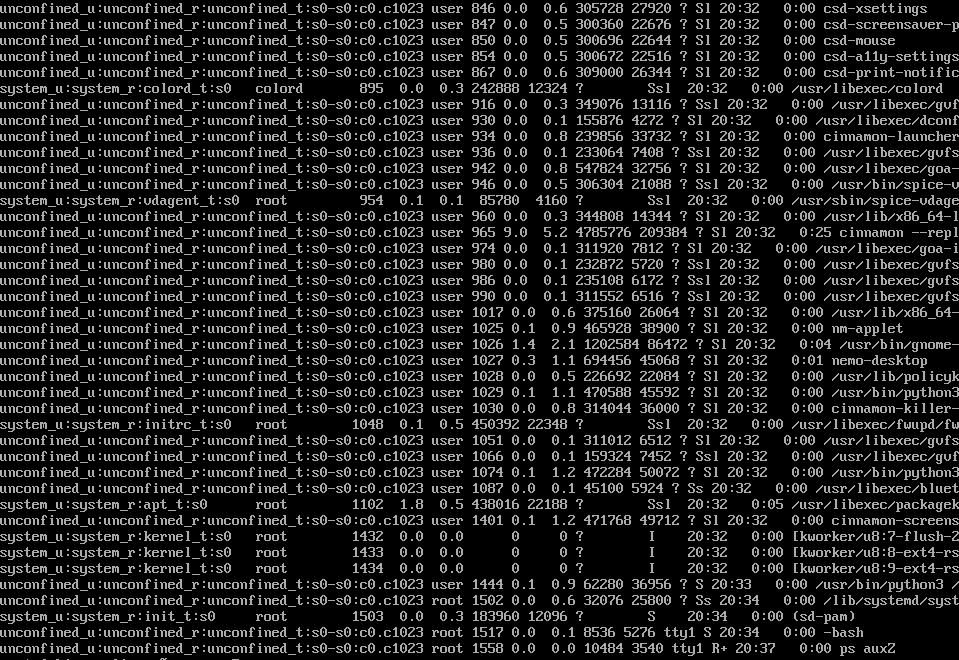
Note that all the processes run by the user “user” are running in the context of unconfined_t, which means they will not be affected by SELinux unless they are attempting to interact with another process which is confined (such as gnome-terminal and dbus).
In some situations allowing users and administrators to be unconfined is desired as this greatly simplifies administration and prevents potential issues, but since we want to confine all processes we need to get those confined. Fortunately, there is an easy way to do this by mapping the user to an SELinux role. Red Hat has some useful documentation on this (as well as a nice set of documentation regarding SELinux in general).
To list the current SELinux user roles, run the following command:
semanage login -l

As we can see, the root user is unconfined, as well as __default__ , which signifies the default user mapping. We need to map our unprivileged user account to a certain SELinux user group. Different groups such as user_u, staff_u, sysadm_u, system_u, and more are available. Check the hyperlink to the Red Hat documentation for more information on the different groups as well as a complete list.
For demonstration purposes, we will map the unprivileged user to the staff_u SELinux group We can accomplish this task by running the following command:
usermod user -Z staff_u
After running this command, lets check the mapped SELinux user roles again using the previous semanage login -l command:
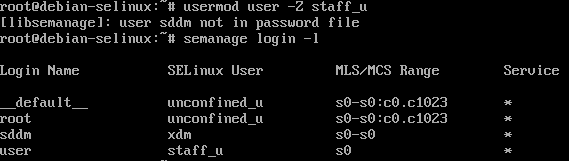
We can now see the Login Name “user” is mapped to the staff_u SELinux user role.
Lets reboot and try to log in as that user now via the Desktop Environment.
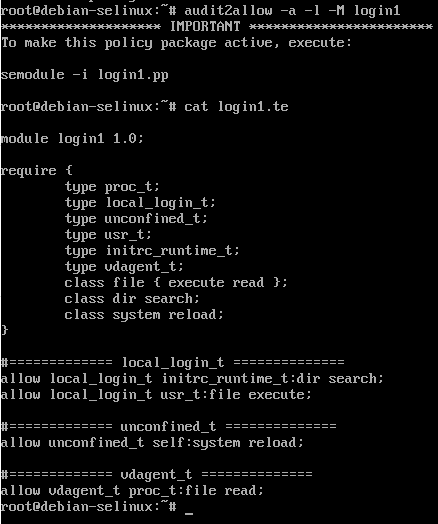
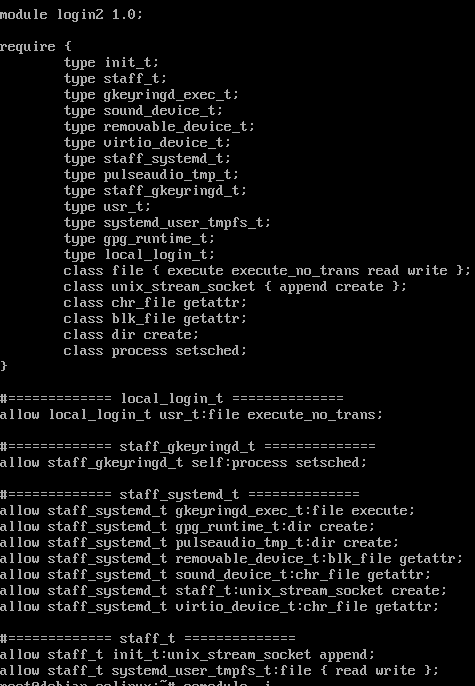
In my case, the login is now not successful, and simply hangs. This is due to all processes being launched by “user” now being confined via the staff_u group. Lets go to a tty and allow this activity. We will also set SELinux to permissive to speed up the process of allowing, since some actions are dependent on others completing.
Set SELinux to permissive temporarily by running the following command from an unconfined root session:
setenforce 0
Now run audit2allow -a -l -M [type policy name here] and load the SELinux policy file with semodule -i [type policy name here].pp. See the .te file involving staff_u denials:
Due to the Desktop environment screen being seized up, I decided to reboot at this stage and get back to the login screen.
Once at the Cinnamon login screen, I switch to a tty and run setenforce 0 to temporarily set SELinux to permissive mode.
Now, we can switch back to the lightdm login screen and attempt to log in.
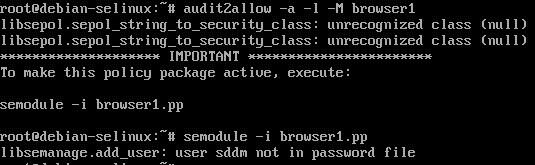
We can see the login was successful due to SELinux being in permissive mode. Now lets allow those denied actions in the tty via audit2allow by running audit2allow -a -l -M login3
Note that we get a compilation error, but it is different from when there are no denials. It appears there is an unrecognized class (null) with an unrecognized action 0x2.

Note that a .te file is still generated, but not the compiled .pp file.
The errors appear at the top of the output “libsepol.sepol_string_to_security_class: unrecognized class (null)”
Based upon reading bug reports and research, I came to the conclusion that we should replace the instances of (null) in the .te file with “dbus“, and the 0x2 corresponds to the dbus action “send_msg” (note that if you see 0x1 in relation to dbus, this should be replaced with acquire_svc).
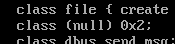

Replace “(null) 0x2” with “dbus send_msg“
Now, we must manually compile that .te file. We can find the commands that allow us to do this by running
man audit2allow | grep -A 1 checkmodule

As shown in the output, we can run
checkmodule -M -m -o login3.mod login3.te
Then, if successful, we can run
semodule_package -o login3.pp -m login3.mod
Now, there should be a login3.pp file in the current working directory which can be loaded normally via semodule -i login3.pp

Now, based upon my own experience an additional step is required. By reading the audit2allow man page, I discovered that audit2allow by default only searches /var/log/audit/audit.log and /var/log/messages for denial messages.
However, /var/log/messages does not exist by default on Debian. Instead, some denials will be logged to /var/log/syslog.
In order to allow denials found in /var/log/syslog, we can run the following command:
cat /var/log/syslog | grep -i denied | audit2allow -M syslog1

Now, lets load this policy using semodule -i syslog1.pp . Note that if you run into similar (null) 0x2 errors like before, then modify the .te and replace with the correct info as shown above and manually compile the .te the same way.
Now lets reboot and see if we can log in via the lightdm login screen when SELinux is in enforcing mode.

We can see the login was successful. Lets switch to tty1 and login as root and check to ensure SELinux is enforcing:
We can see SELinux is enforcing.
Now if we run ps auxZ we can see that processes run by the confined user are now running under the staff_t, staff_u, and staff_r contexts:
Since the default SELinux policy packages confined any process run by root as default, as well as high risk processes like firefox, java, etc, you now have all processes confined.
Lets switch back to the GUI and open up Firefox. In my case, the process did not open, most likely due to SELinux. Lets switch back to our tty1 and set SELinux to permissive via setenforce 0, then retry the behavior and allow whatever was denied.

Now that Firefox has opened in permissive mode, lets go back to our tty1 and use audit2allow as well as check /var/log/syslog to allow any denied actions.
We can see in the .te file for browser1 policy that there are several things that were blocked relating to mozilla_t, the SELinux policy for Mozilla Firefox.
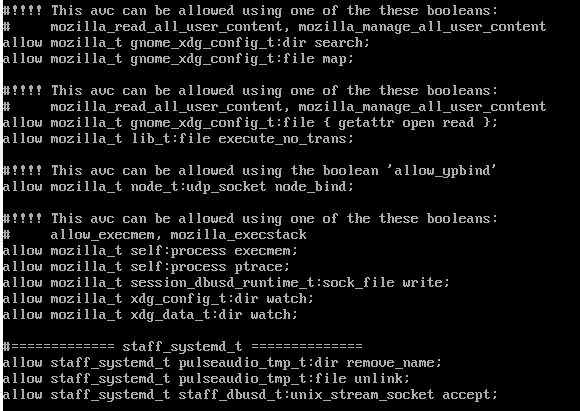
We can see several suggestions to enable SELinux booleans, so lets do that in addition to installing the browser1.pp policy file via:
setsebool -P mozilla_read_all_user_content 1
setsebool -P mozilla_manage_all_user_content 1
setsebool -P allow_ypbind 1
setsebool -P mozilla_execstack 1

Now exit out of Firefox in the user session, and go back to the tty and re enable enforcing mode by running:
setenforce 1
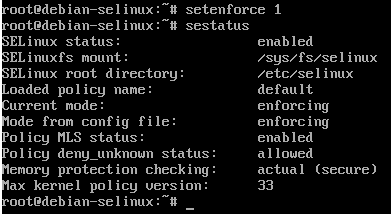
Also double check with sestatus that enforcing mode is actually enabled.
Now lets go back to the Cinnamon Desktop environment and attempt to open Firefox when everything is in enforcing mode:
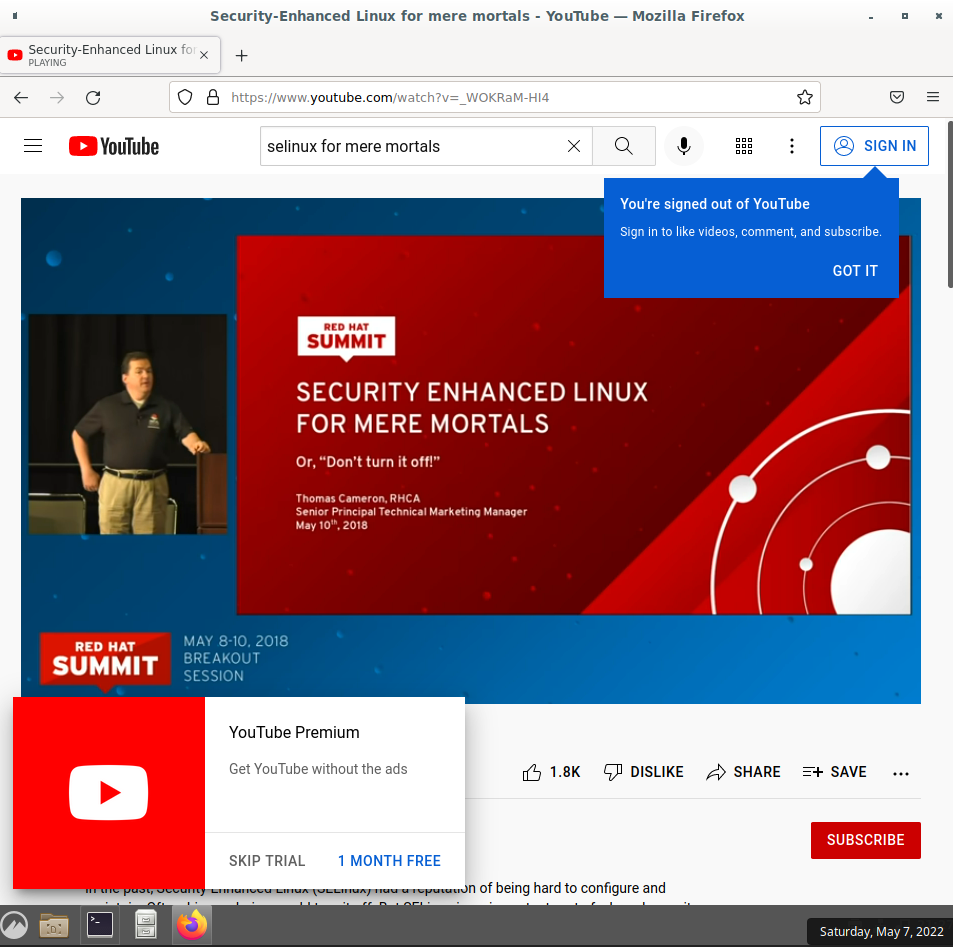
We can see Mozilla Firefox is now running and able to watch YouTube videos.
If we run ps axZ we can see firefox is running under the staff_u:staff_r:mozilla_t security context:

This should be a pretty good start to confining your user sessions with SELinux on a Debian Linux workstation. Obviously if you are using a server you won’t need to do as much as there isn’t a complicated Desktop Environment you will need to allow actions for. However, the tutorial will still be useful in setting up a Debian server with SELinux mandatory access control.
The last thing we will work on is setting up this user to have sudo rights, and configuring sudo to transition the user from the staff_t to the sysadm_t security context when they run sudo. The sysadm group has more permissions by default, and many users need to utilize sudo. The previously mentioned Red Hat Documentation also shows us how to do this.
Go back to the unconfined root shell, and run:
visudo -f /etc/sudoers.d/user
And add the following line (corresponding with whatever username you actually used for this account, in my case it is simply “user”):
user ALL=(ALL) TYPE=sysadm_t ROLE=sysadm_r ALL
Now go back into the GUI session and open up a terminal. Run:
id -Z
Then run
sudo id -Z
You should see output similar to the following:
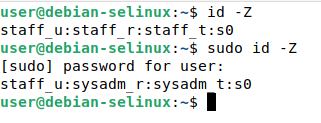
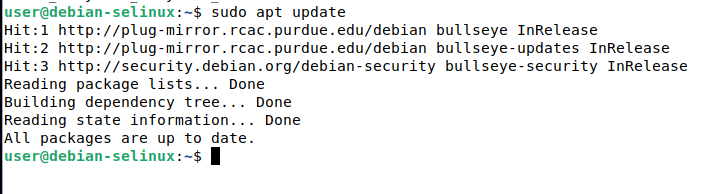
Note how the SELinux contexts outputted from the commands changed when sudo was used. Now our user can use sudo as the sysadm role and sysadm type. We can perform things like running sudo apt update:
Final Thoughts
This tutorial should be a good start to get your Debian system using SELinux, which should greatly enhance security and provides many benefits compared to using AppArmor. As you can see a lot of work is involved with initial set up, but once its set up, there will be minimal activity needed once you have allowed all the normal activity you usually perform.
Installing new, previously unused software may result in more denials, and software updates may cause a similar effect. However, once you are used to using these tools as well as knowing what the symptoms of an SELinux denial are, you should be able to quickly remediate these.
Running a setup such as this can and will mitigate many known and unknown vulnerabilities, such as the Polkit privilege escalation vulnerability CVE-2021-4034.